Wednesday, March 30, 2011

Day 18

Day 18

I continue doing research for the cracking of the earth. I post a thread on odforce but ended up with no reply. And there isn't really much help online too regarding my problem.

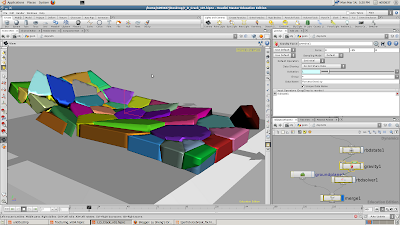
I consulted Mr Ron and he gave me his idea/solution. Below is how it looks:


Mr Ron first made a grid and use a mountain and smooth to make it look like a terrain. Then he used a cookie and separated both sides of the terrain into different geometries. He extruded the plane and added subdivisions to the extruded height of the plane. He then group the intersecting edges and used a point node with a ramp to control the jaggedness of the edges. Then a facet is used before it is connected to a voronoi fracture node. Then he used a point node to animate the terrain opening up by using this expression for the position attribute:
$TZ + ($BBX *smooth($F,1,200))+.5


What this does is it adds the bounding box value of X to the position value in Z. The smooth function is to allow it to move from 0 to 1 within frame 1 to 200. The addition of 5 is to close up the geometry with the other side.

The other side is repeated and a merge tool is used to join them together.


This is how it looks when the terrain opens up:


Now Mr Ron started to set up the hierarchy for the pieces collapsing. It typically is exactly the same as what is shown last week to Mr Douglas.
A box is set up and a point node with a expression
$TZ *$BBX is used to make the box look like how the crack on the earth will spilt apart.

A transform node was used to animate the box:

A timeshift node is used to time when the box will start scaling up. But in this case is after frame 50 as he didn't want the pieces to start collapsing almost immediately when the crack just opened up. Next a group node is used to group the points within the bounding box of the box. Then the points that are affected are coloured red. A foreach node is used to promote the points parameters into parameters for the primitives, in this case the pieces which are going to fall. Then the sequence is saved out and re-imported, to reduce the time needed for cooking.

Inside the dop network, the same hierarchy is used before. A rbdglueobject is used to import the geometry. Then a group node to group the pieces which are going to fall according to colour. Then a gravity node is used to make them fall. A rbdstate node is used to only activate the pieces which are going to fall and nothing else. And a solver is also used.

Tuesday, March 29, 2011

Day 17

We went for the NUS-MDA SHAPE interview at NUS. The interview was pretty short and quick and it wasn't as intense as I expected it to be. But that interview will determine if we have any funding at all when we go to sidefx for our IAP.

The questions they asked were general. Like, introduce yourself, What you want to do next time? And how is the trip going to help you and etc. I mentioned about the FYP project we are doing and they seemed to be very interested. They even asked me to mention more about that to them as they wanted to know more.

Monday, March 28, 2011

Day 16

Today I did explore further on how to create the earth splitting. I did some initial test and the results are shown below:

I used a ordinary plane and extrude it:


I painted the crack line on it and group it in a group:


I did a simple voronoi fracture for it. Then I grouped the geometry of both sides of the ground into 2 seperate groups and animate them apart. The result is show below:

Day 15

I rendered and tweak my dust particles today and helped the other group with their filming.

Thursday, March 24, 2011

Day 14

Mr Douglas dropped by again today for our weekly progress check. I showed him all the fracturing I did yesterday. Mr Douglas told me that the kind of direction he wanted for the fracturing was that he wants the crack lines to be derived from the earth splitting and not the crack splitting the earth.

And I was thinking of adding the fracturing method I did yesterday to layer it with the earth splitting effect.

I am still messing around at odforce, trying to find something related to it. But I don't have a clue on how to start doing that effect.

Wednesday, March 23, 2011

Day 13

I started doing some cracking after the low resolution of the terrain was completed. I started with some tests. Mr Ron helped me made it such a way that only the painted crack lines geometry will fall and not the rest of it. There are still some crazy pieces which are moving around too though. I believe it still could be further worked on and improved.

Own Test:


This was done using a sculpt tool to sculpt up the bumps from a terrain plate generated from a grid and a mountain. Simple test.

Terrain Crack Test 1:

After the terrain was done at low resolution and passed to me, I did a fractured test below:


I found that there are some pieces of geometry still floating around and the falling still needs more tweaking.

Terrain Crack Test 2:

I did more tweaking, such as adjusting the density, friction, bounciness and etc:


There is still floating geometry pieces around. I tried using rbdglueobject but it doesn't work. The pieces doesn't break apart. But more or less something is still there.

Below is the terrain with the original color:

Tuesday, March 22, 2011

Day 12

Today, I continued tweaking the dust particles of my wall fracturing. Below are the results:

Dust with velocity and motion blur:

The new dust render took significantly longer render time compared to the one without velocity and motion blur.


Final Composite:
 

I also explored further on the cracking of the terrain still. But I was wondering could I just build a terrain that has volume and crack the top part in and not the sides in also?

Monday, March 21, 2011

Day 11

Today I rendered out my wall fracturing after weeks of tweaking. Below is the result:

Wall fracturing:


Dust:
 

Final Composite:
 

I find that it needs more tweaking for the dust so I will be working on it more while waiting for the terrain to be completed.

Day 10

Today, I helped the other group with their filming for their FYP project.

Thursday, March 17, 2011

Day 9

Today was the day Mr Douglas came to meet us and review our progress on our research and development. He did a one on one look at how much research we had done and also showed us roughly the references he have for us, in terms of fracturing and fluids. We also knew roughly where our next step should be and the direction we should be heading. Overall, I learnt more about the production phase.

For now, we got to wait for the references of the terrain Mr Douglas will be sending us to arrive, and so we could start on a lower resolution terrain model probably tomorrow.

I continued working on the wall fracturing thing that I wanted to put it inside my demo reel and I solved the floating geometries problem by lowering down the bounciness of the object and the ground plane. But after solving that, I realised I had another problem, the proxy geometry no longer match the pre-fractured object. I tried adjusting many parameters like, friction, density, gravity etc. But the result still doesn't work. Hopefully, it could be fixed soon, and I could start my render sometime this week.

Day 8

Today, I didn't do much on the ground cracking as the Research and Development phase is more or less complete in my opinion. But instead, I worked on the wall fracturing which I wanted to put in my reel for the sidefx attachment interview.

At first I still had that geometry floating problem. Mr Ron suggested that maybe it was because of the geometry normals or the angular velocity is driving the object even after the collision had occured. He helped me do the angular velocity in a rbdstate node rather than inside a rbdglueobject node. That solves the problem, but I still need to tweak the bounciness of the wall and the plane itself to optimise the result.

Tuesday, March 15, 2011

Day 7

Today, I did more R and D on cracking, and Mr Ron continued helping me with the cracking of the ground plane he stopped with yesterday. He also found a thread on odforce which is more relevant to what we are trying for now. Below is a screen shot:

We did the test cracking of the ground:

Color generated by a sphere used for cracking:


 This is the final result:


Color generated by a curve used for cracking:


This is the final result:


With the help of Mr Ron, I created a grid, then I created a new attribute called crack. I painted the crack points using the paint node. Then I used a scatter node to scatter the points according to the crack attribute I created above. I added a voronoi fracture node to simulate all the crack lines. Then to simulate the crack and also have the ability to add more control to it, Mr Ron helped me suggested a way of doing it by controlling the cracking by color. Mr Ron helped me did a test by using a sphere as a starting point object for the crack. Then added color node to both the voronoi fracture node and the sphere node. The sphere node red and the voronoi fracture node black. Then used a attributetransfer node to control the distant threshold. We set a expression $T*5 and when its played, the red sphere will grow bigger as time pass.

Then, Mr Ron helped me add a foreach node as the color values is based on per point basis and we need it to be affected every piece of the geometry. Inside the foreach node, a attributepromote node is added to convert the class data type from point to primitive.

We then proceed to inside the dop network. With the help of Mr Ron, I set up a rbdfracturedobject node inside.( The reason why rbdglueobject wasn't used is because the glue and the glue impulse attribute isn't needed as we are not controlling when the object will break apart.) Then a group node is created, the reason is because, we are trying to group the geometry that is going to be cracked together by identifying their color attributes. Then after the group is determined, a gravity node is introduced, to make the cracked pieces fall. I added a noise function to the gravity node, to give it some randomness. Then the usual rbdsolver and ground plane is added.

After making sure it works, Mr Ron asked me to try and use a curve and animate it instead of using a sphere. Above is the result.

I also did the wall fracturing for my reel. When I playblasted it out, I realised there was a problem. The problem is that after the wall collapsed, the fractured pieces collided with each other and resulted in more collisions which caused the fractured pieces to somehow "float" around. Below is how it looks:

Mr Ron then suggested to me to try and use the rbdautofreeze node. What it does was that it freezes rbd objects when it comes to rest. But I haven't got it work though.
The video which had "floating" pieces of geometries:

Monday, March 14, 2011

Day 6

Today, I did more R & D on the cracking part. But this time, I was directing more of my time on both voronoi fracturing and curve-generated cracks. I tried to merge them both together but it doesn't work. Below are some screenshots:

When I tried to combine it both together, the voronoi fracture doesn't work and the geometry that is cracking becomes weird.


I found another interesting way to crack a floor, by using particles:


The popnet hierarchy:


This method could be explored further though.

Sunday, March 13, 2011

Day 5

Today, I decided to work on a portion of my demo reel today. It was the part of the wall crashing down which I used in my studio project recently. The things that I did was that I tried to use a proxy geometry to cover up for the pre cracked geometry. I had some problems trying to match the rotation and the speed and the pivoting of the axis. That aside, I successfully added dust particles to appear at the right time when the wall crashed. Below are some screen shots,


The wireframe model is the pre-fractured model, while the shaded model is the proxy model. I tried to match as closely as possible when it falls, but there was a jump frame everytime during playback. My nodes hierarchy works, now the problem is just matching it with the pre-fractured geometry. I tried using dynamics to match it, but somehow the falling is even more off. Even when I use back the same hierarchy inside the dopnetwork. In the end, I used the keyframe method. Below is the hierarchy:


I did the dust particles generated from the wall crashing. I did it the same way as how I did it before, just that I integrate it into the single scene. Below is the screen shot:


We went to Fusion Show 2011 and looked at some of our seniors works and also some of the works in other courses. Some works are awesome too.

We also went for the Siggraph screening at the electronic theatre. I especially liked the spider clip. The spider itself looks breathtaking, and even the spider web also.
I found that the industry is growing very rapidly and the quality of work is getting better and better.

Thursday, March 10, 2011

Day 4

I did more research and tests today on the cracking. I found another way of doing cracking by using a cellular crack node. it works the same way as how a texture map is used to create the crack. Below is the link from sidefx about it:

http://www.sidefx.com/docs/houdini10.0/nodes/vop/cellcracks

And I followed a tutorial that teaches me how to set it up:

http://www.sidefx.com/docs/houdini8/content/base/tutorials/fm_08_guide_shading_1012996.xml

Below is the screenshot of how it looks like after I tried it:


Mr Ron also helped me fixed the problems and look through all the issues that I raised on my blog yesterday.

1: The jumping while cracking problem


The problem is that there is overlapping geometry caused by the polyWire width being too big. I made it smaller. Mr Ron helped me add an expression so that the crack will grow bigger as the animation plays through. Mr Ron also helped me increase the divisions of both the ground and the polywire divisions.

Below is how it looks:


2: Ground Crack from the odforce forum.

Mr Ron explained to me roughly what is going on in the entire hierarchy.

This is how the crack looks:


And the hierarchy:


The crack is generated using a L-system crack. The crack is then re-imported it in as a geometry file. The crack lines is then split into 2 groups using a delete node. The main reason of that is first to fix the point numbers and then color it using a point node. Then fusing it together into one again. And using a point node again to generate some randomness into the crack lines. The rest of the hierarchy is more or less same as the original L-system crack hierarchy.

How to remove crack lines from a pre-fractured geometry:

Mr Ron showed me how I could remove crack lines from a pre-fractured geometry using a proxy object.

Firstly, We did a test fracture below:


A proxy geometry is used:


And a switch node is used to switch between the proxy geometry and the fractured geometry.

Tuesday, March 8, 2011

Day 3

I started the day by doing more research on cracking. I found 2 other ways that can be used to create the cracking effect.
1. Cracking using metaballs.

Below is the thread I found on odforce and how it looks:
http://forums.odforce.net/index.php?/topic/12133-housing-collapse/

How it looks:
The scene hierarchy.


I found a very interesting ground cracking file on the odforce forum. Below is the thread:

http://forums.odforce.net/index.php?/topic/4032-ground-%3Cspan%20class=


And this was how it looks:

This is the scene hierarchy.


I looked through the network tree. I do not really understand how it really works for this. But what I can understand is that he drew out the crack lines using Lsystems and re-imported the crack lines into houdini as a bgeo file format. I do not really understand how the plane was acquired. But I somehow feels that it works the same way as how a ordinary Lsystem cracks a floor.

I did a test on my own using the L-system cracking method. But I encountered a problem. When I play the animation, the crack works but somehow the box geometry turns out crazy. I got no idea what is wrong though. Below is how it looks.


I thought of something while I was working on the above crack. I wonder will it work if I combined both Lsystem fracturing with voronoi fracturing? That means the first crack will come from the Lsystem crack lines and the subsequent crack lines could branch out from the Lsystem root crack line and maybe I could blend it with voronoi fracturing? Or maybe just doing L system is much better? I think I should give it serious thought.

Day 2

Today I did some research on flooding and fluids stuffs in the morning before Mr Ron came in. Below are some links to some videos which I found on both sidefx.com and odforce.net forums:

http://www.vimeo.com/17837109
http://vimeo.com/15625907
http://vimeo.com/16325945
http://vimeo.com/15595033
http://www.youtube.com/watch?v=beQuS3-5OcI

I also watched Percy Jackson and the Lightning Thief and took note of the part where the water involved is large scale. Below are some screen shots:


I found one of  guys who did the simulation isn't using houdini to do the flooding but instead using ExoticNaiad to do it. I still decided to include it because I found that the result was quite good still though. And I wanted to use it as a reference.

Once Mr Ron came in and told me to maybe do some research on cracking of ground, I went back into the forums and started looking around. I found a discussion going on about animating a wall cracking using Lsystems. I downloaded the file and started messing around with it.

I found a thread which talks more about L-system cracking and a file which I could download and play with it.
http://forums.odforce.net/index.php?/topic/12604-animating-a-crack-up-a-wall-in-houdini/page__hl__crack__fromsearch__1

Below is how it looks like:


This is how the hierarchy looks like:

Monday, March 7, 2011

Day 1

Monday 07 March 2011

We started off our first day of FYP setting up our blogs and also took a glance at the storyboard of the project we are going to be doing for the next 3 months. We will be doing stuffs like fluids and cracking stuffs. We also spend the day setting up Linux on our computers..

I also looked for some references on flooding.